ICE.TCP Pro Installation Notes Important Note: These instructions for installation supersede the instructions in the printed manual. For early users of ICE.TCP Pro, these installation instructions are significantly different. Please read carefully. Overview of the Install Procedure ICE.TCP Pro provides a new network install procedure as well as improved installation for machines not on a Windows network. The network install enables you to deliver pre-configured installations to your client PCs. It also provides centralized information about the PCs on which the software is installed. There are two components to the ICE.TCP Pro installation: Server Install and User Install. One Windows 200x/XP/Vista/Windows 7 machine on your network must be used as the "Server" (see definition below). PCs that require ICE.TCP Pro can install it over the network from this Server PC. Alternatively, they may install from the CD and configure from the Server PC or from removable media (see Advanced/Remote Installation below). The administrator performs the Server Install on a Windows 200x/XP/Vista/Windows 7 machine from the ICE.TCP Pro CD. After installation, a valid license key must be entered into the LicenseAdmin program. User installs can then be performed on the Server PC and the other machines on your network. If you perform a user install on the Server PC, you can customize our program for your network and save those settings as the defaults for all subsequent user installs. The remainder of this document gives step-by-step details of how to install ICE.TCP Pro. Please note that much of the installation work has moved to the Server Install. This means that, while the Server Install may seem to take extra steps, these steps will save considerable time during User InstallsServer
Installation
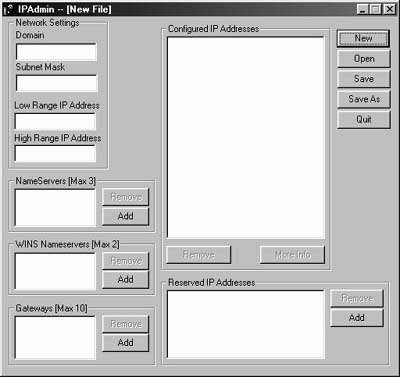
When you insert the ICE.TCP Pro CD, the autorun feature (if enabled on your CD drive) will start and may take up to 30 seconds. Alternatively, you may start it from Windows by choosing Start, Run, and then [CD-ROM drive letter]:\Setup. Choose Server Install and accept the defaults. This sets up folders and copies files to the ICE.TCP Pro Server. The Server Install procedure provides optional components (Internet Explorer and Adobe Acrobat). If you select these optional components, these programs are placed in the \Program Files\J River\ICETCP5 Server\TCP5_User directory from where they can be installed on other PCs. Note: A web browser is required to access the online help of ICE.TCP Pro. Internet Explorer 7 is the latest version of Microsoft’s web browser. Adobe Acrobat allows you to access files that are in PDF format. We include both PDF and HTML versions of our manual with each user installation of ICE.TCP Pro. When the ICE.TCP Pro Server software is installed, two folders are created: TCP5 Admin, containing administrative programs (LicenseAdmin and IPAdmin), and TCP5_User, containing the folders and files needed for installation on client PCs. Step 3: Enter Licensing Information
Step 5: Perform a User Install on the Server PC
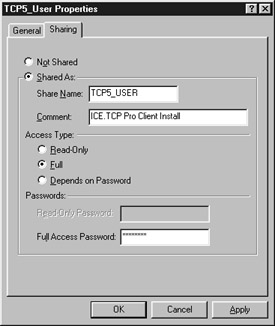
Step 6: Customize ICE.TCP Pro for the Users on your Network Open Telnet Pro and select organize profiles from the profiles menu. Use the add button to make a new profile. Double-click on the new profile and modify the terminal type, color combinations, and other options that are required on you network. Click OK to save the profile. Next, click on Save to File. This customized file will be used during all subsequent installs. Give it an appropriate name (such as Sales, Marketing or Operations) and save it in \Program Files\J River\ICETCP5 Server\TCP5_User\Data\. The files that are located in this directory are the configuration profile options that will be presented as options in ConfigWizard for all subsequent user installs. You may save multiple profiles with different names. Step 7: Share the TCP5_User Folder
User Installation - Networking Available
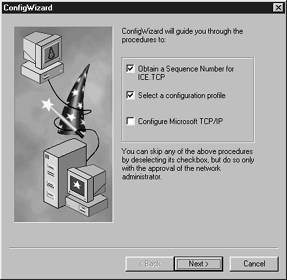
Step 1: Install ICE.TCP Pro From the Server PC Using the Network Neighborhood, Places, or the Find Computer command, double-click on the icon representing the Server PC. Double-click on the folder named TCP5_User. When the folder opens, run the Setup program. The Setup program prompts you to select either Version 5.1 Telnet Pro (the preferred choice) or Version 4.4 DejaWinT (Classic). By default, Setup installs the ICE.TCP programs in either the C:\Program Files\J River\ICETCP5 directory (Version 5.1) or the C:\Program Files\J River\ICETCP4 directory (Version 4.4), and then automatically runs the configuration program ConfigWizard. Step 2: Configure ICE.TCP Pro using ConfigWizard ConfigWizard is run automatically at the end of the install. The user must select the first two options available: obtain a sequence number and select a configuration profile. Note: Versions older than 5.1.27 require an entry in the Comments field. Reboot the computer when prompted to do so. If TCP/IP networking already exists, deselect the TCP/IP configuration function in ConfigWizard. A method exists to disable TCP/IP configuration and to automate the use of ConfigWizard. For more information, see www.icetcp.com/support. Note on Sequence Numbers: ICE.TCP Pro’s administrative programs automatically assign and keep track of sequence numbers for User PCs. ConfigWizard uses LicenseAdmin’s configuration files to obtain an available sequence number. User Installation -
Networking Not Available Overview of the Install Procedure The installation procedure described above requires that each user PC has network access to the Server PC. If this is not the case, the following steps illustrate how to install Pro on remote PCs, that is, PCs without network access to the ICE.TCP Pro server. Step 1: Disable Network Installation Capability Disable the ICE.TCP Pro server by unsharing the TCP5_User folder. In this instance, all of your configuration and licensing information will be on the removable media. This means that you may NOT also use the network installation at the same time or you will duplicate licenses and IP information on multiple PCs. Step 2: Export License and Configuration (Sequence Numbers) Information from Server. From the ICE.TCP Pro server, copy the Licenses and Data folders onto removable media. The default location is C:\Program Files\J River\ICETCP5 Server\TCP5_User. Also copy ConfigWizard to the removable media. The default location for version 5.1 Telnet Pro is C:\Program Files\J River\ICETCP5 Server\TCP5_User\TCP-PRO\ConfigWizard.exe; the default location for version 4.4 DejaWinT (Classic) is C:\Program Files\J River\ICETCP5 Server\TCP5_User\TCP4-32\ConfigWizard44.exe. Step 3: Install ICE.TCP Pro on Remote PCs Insert the ICE.TCP Pro CD into the CD drive of the remote PC and run the Setup program, located in the User Install Files folder on the CD. Follow the instructions that appear. When prompted for the location of the configuration program ConfigWizard, cancel out of ConfigWizard, insert the removable media into the disk drive, specify the removable media drive in the dialog box, and click on ConfigWizard.exe or ConfigWizard44.exe, depending on the version you installed. ConfigWizard uses LicenseAdmin’s configuration files to obtain an available sequence number from the removable media. The Name field displays the user’s name. Additional information, such as phone numbers, can be entered in the Comments field. Note: Versions older than 5.1.27 require an entry in the Comments field. Exit ConfigWizard by clicking the Exit button. Repeat at each remote machine that needs a sequence number. Step 4: Import License and Configuration Information Back to the Server After installations are completed on the remote or non-network PCs, copy the Licenses and Data folders from the removable media back to the ICE.TCP Pro server – \Program Files\J River\ICETCP5 Server\TCP5_User – overwriting the Licenses and Data folders there. At this point the LicenseAdmin program on the license server machine should show the remote client users (as well as any lan users that were there before). Step 5: Restore Network Installation Capability Restore the ability to perform user installations from the ICE.TCP Pro server by sharing the TCP5_User folder, as described in Step 7 of the Server Install instructions. J. River Technical Support
Sample User Install Instructions
Installation from the Server to a PC
|
|